The Best OBS Settings For Streaming 2025
If you want to learn how to use OBS (Open Broadcaster Software) for recording or streaming on Twitch and YouTube, this guide is for you. Setting up OBS can be hard for beginners, and getting the right settings is important to avoid issues like laggy streams or poor video quality.
Learn the basic OBS settings, including how to adjust video and audio and follow these steps to improve your setup and have a smoother streaming experience, even on a simple computer.
Moreover, The tips here will help you get better streaming quality and fix common issues like lag or low video performance. When streaming on Twitch with OBS, knowing about Backseating in Twitch can also help.
Table of Contents
What Is OBS
OBS (Open Broadcaster Software) is a free tool for recording and streaming live on sites like Twitch and YouTube. However, It helps you set up scenes with different video sources and makes streaming easy for creators. The best OBS settings vary based on your platform and device.
Essential OBS Settings for Streaming – Basic Guide for All
Upload speed is important for live streaming because it affects stream quality. Moreover, Aim for about 5 Mbps to get the perfect output. Next, we’ll go over other important settings and adjustments in OBS.
General Settings
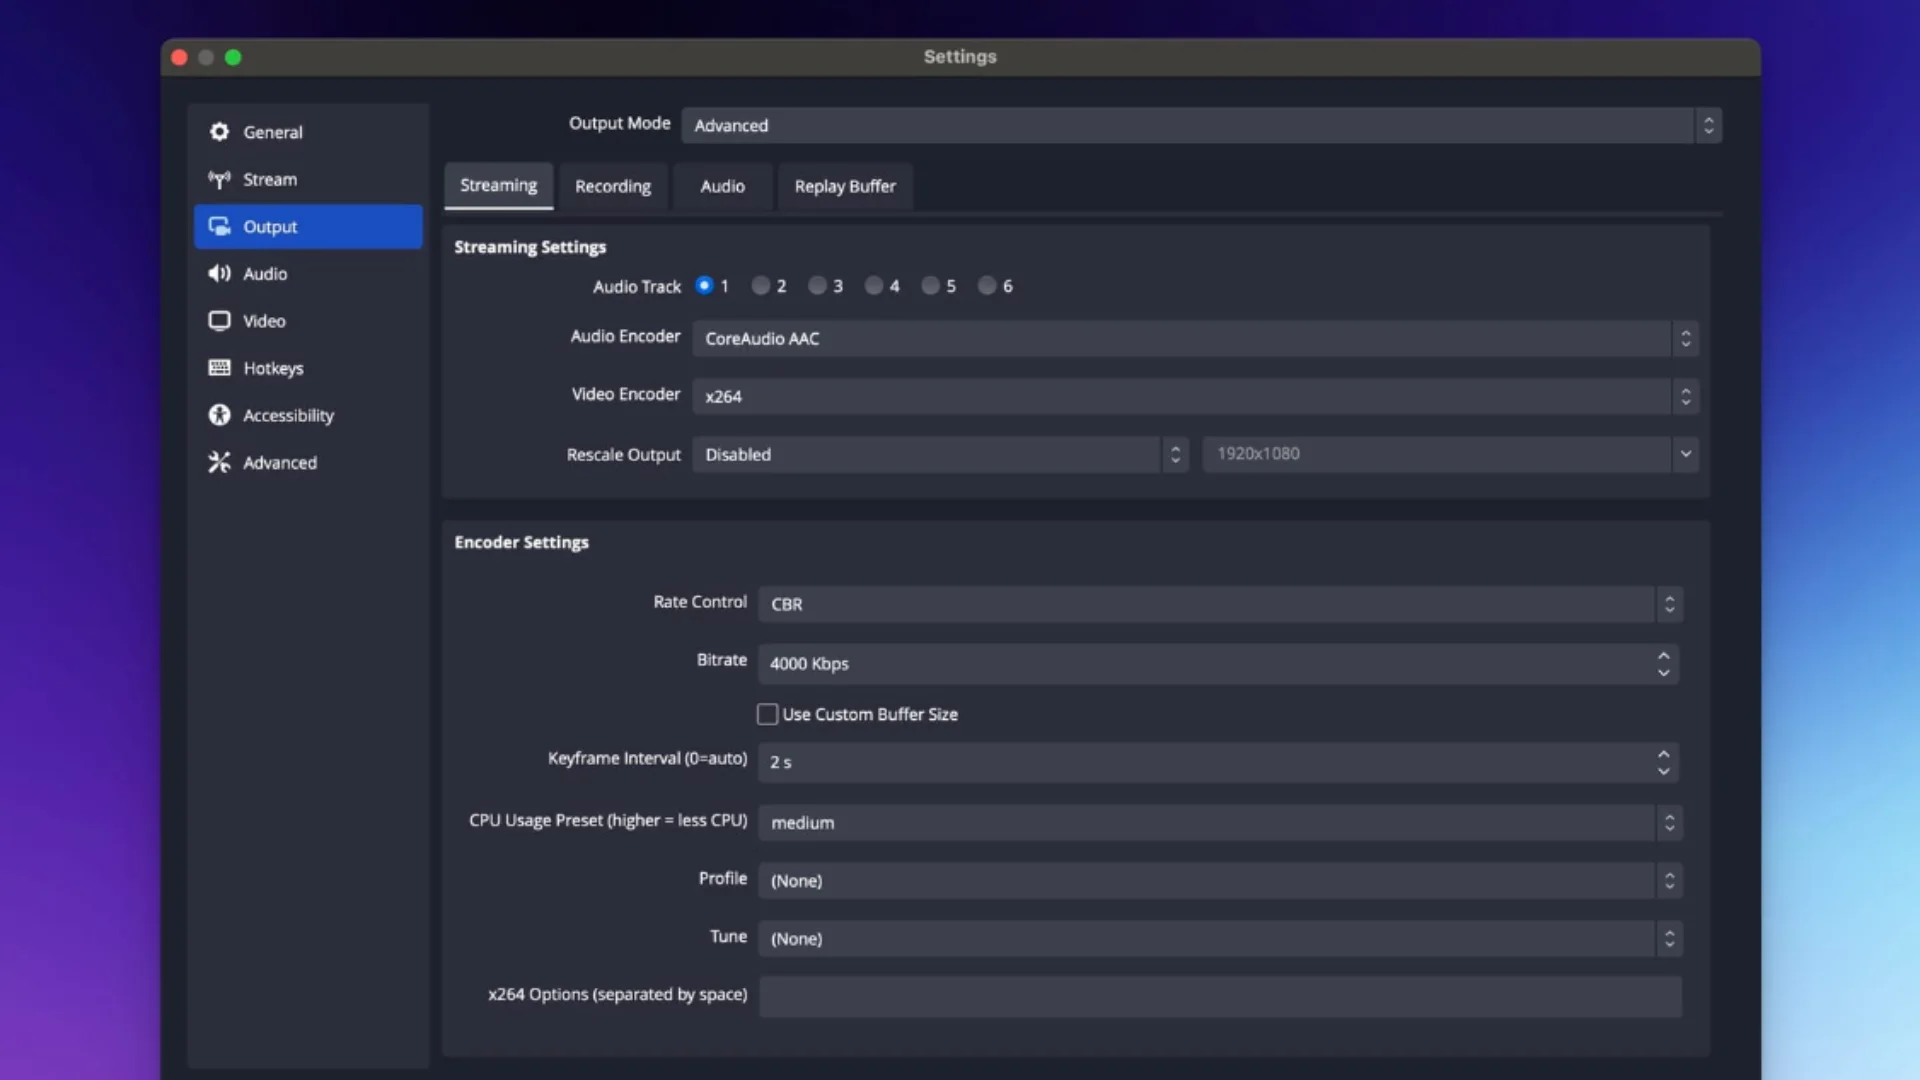
Open OBS Studio and click Settings in the bottom right corner. Select the output tab and change it to “Advanced Options”.
Video Settings
Choose the “Video Bitrate” to 4000 and enjoy the Full HD (1080 p) at 30fps.
Audio Settings
For better sound quality, set the audio bitrate to 320 Kbps. A bitrate of 160 Kbps is usually enough if you are not streaming music.
Keyframe Interval
Set the keyframe interval to 2 seconds to keep a good balance between data and stream quality.
CPU Usage Preset
Adjust the CPU Usage Preset based on your PC’s specifications. Lowering it can improve stream quality but may put more strain on your device. If your device has trouble streaming smoothly, try increasing this setting.
If you’re dealing with delays during your stream, learn What is Low Latency on Twitch? and how to adjust it for better results.
Adjusting OBS For Basic Computers
To help OBS run more smoothly on low-end computers and achieve clear video recordings, modify your settings to match your system’s capabilities.
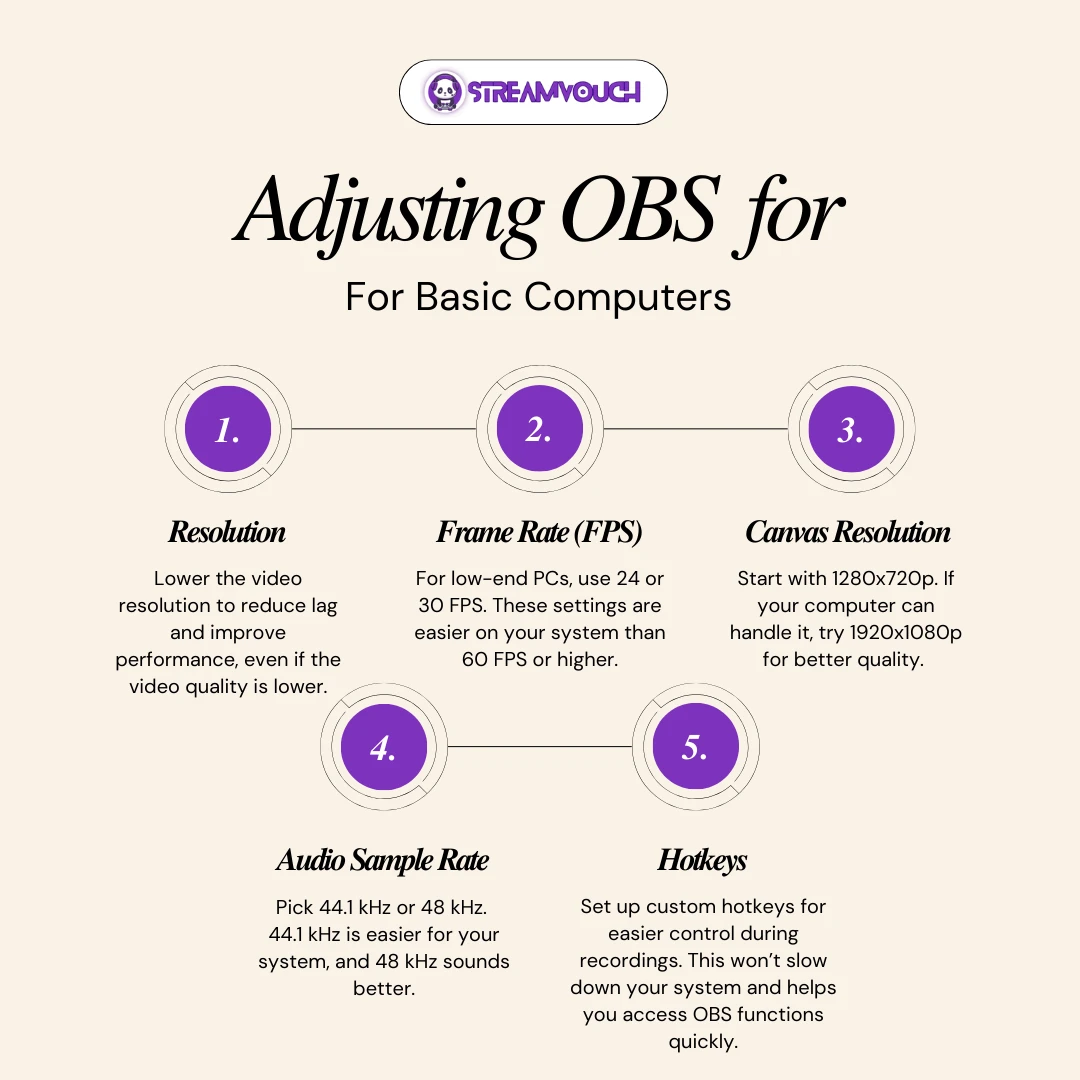
Resolution:
Lower the video resolution to reduce lag and improve performance, even if the video quality is lower.
Frame Rate (FPS):
For low-end PCs, use 24 or 30 FPS. These settings are easier on your system than 60 FPS or higher.
Canvas Resolution:
Start with 1280x720p. If your computer can handle it, try 1920x1080p for better quality. Check out both resolutions to find which one is perfect for you.
Audio Sample Rate:
Pick 44.1 kHz or 48 kHz. 44.1 kHz is easier for your system, and 48 kHz sounds better.
Hotkeys:
Set up custom hotkeys for easier control during recordings. This won’t slow down your system and helps you access OBS functions quickly. A big part of optimizing OBS is knowing what is a good bitrate for Twitch so your stream looks clear without overloading your internet.
Best OBS Setup For Streaming 1080p Video At 60fps
Use the following settings to have the best OBS settings for streaming.
Step 1: Check Your Display Settings
Select the “Display Settings” on your PC. Find the recommended resolution and select it.
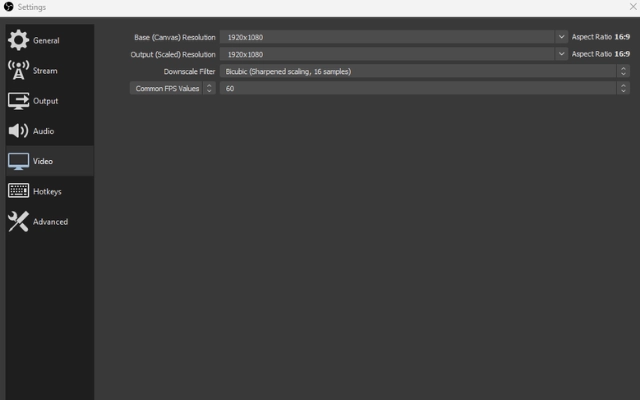
Step 2: Change Video Settings in OBS
Open OBS, go to Settings, then Video. Set the “Base (Canvas) Resolution” to your screen size. Change the “Output (Scaled) Resolution” to “1920×1080.” For the best quality, select “Lanczos.” For better performance, choose Bicubic.

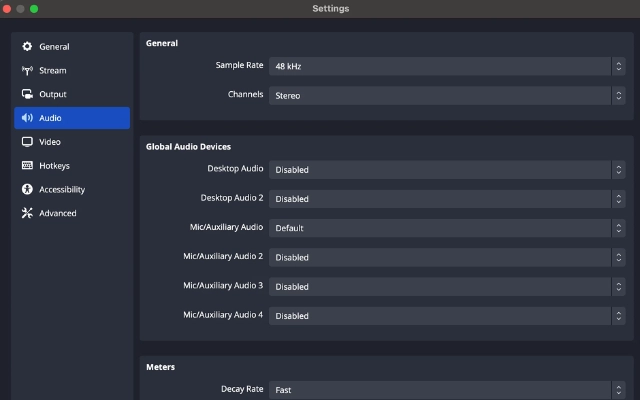
Step 3: Set Audio Options
In OBS, go to Settings, then Audio. Keep the Sample Rate to 48 kHz and select Stereo for Channels. Keep the Audio Bitrate at 320 kbps by tapping into “Output“.
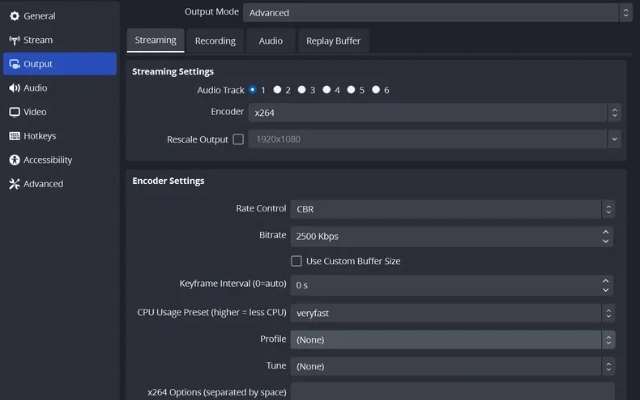
Step 4: Configure Encoding
In the Output settings, switch to Advanced mode and go to the Streaming tab. If your graphics card supports it, choose NVIDIA NVENC as the Encoder. If not, select x264 to use your CPU.
Step 5: Adjust Rate Control and Bitrate
Set Rate Control to CBR. Set the Bitrate to 6000 for 1080p at 60 FPS.
Step 6: Set Keyframe Interval
Keep the Keyframe Interval to 2 seconds. Moreover, Set the Preset to Quality and the Profile to Main. Keep other settings as they are.
Step 7: Set Up Streaming
In the Stream settings, choose your streaming service.
Step 8: Turn on Game Mode
Search for Game Mode in your start menu, press Enter, and enable it to optimize your PC for gaming.
Optimizing your OBS settings ensures a smooth stream, but performance also depends on your audience size. Some Kick streamers even seek ways to grow their viewer count quickly.
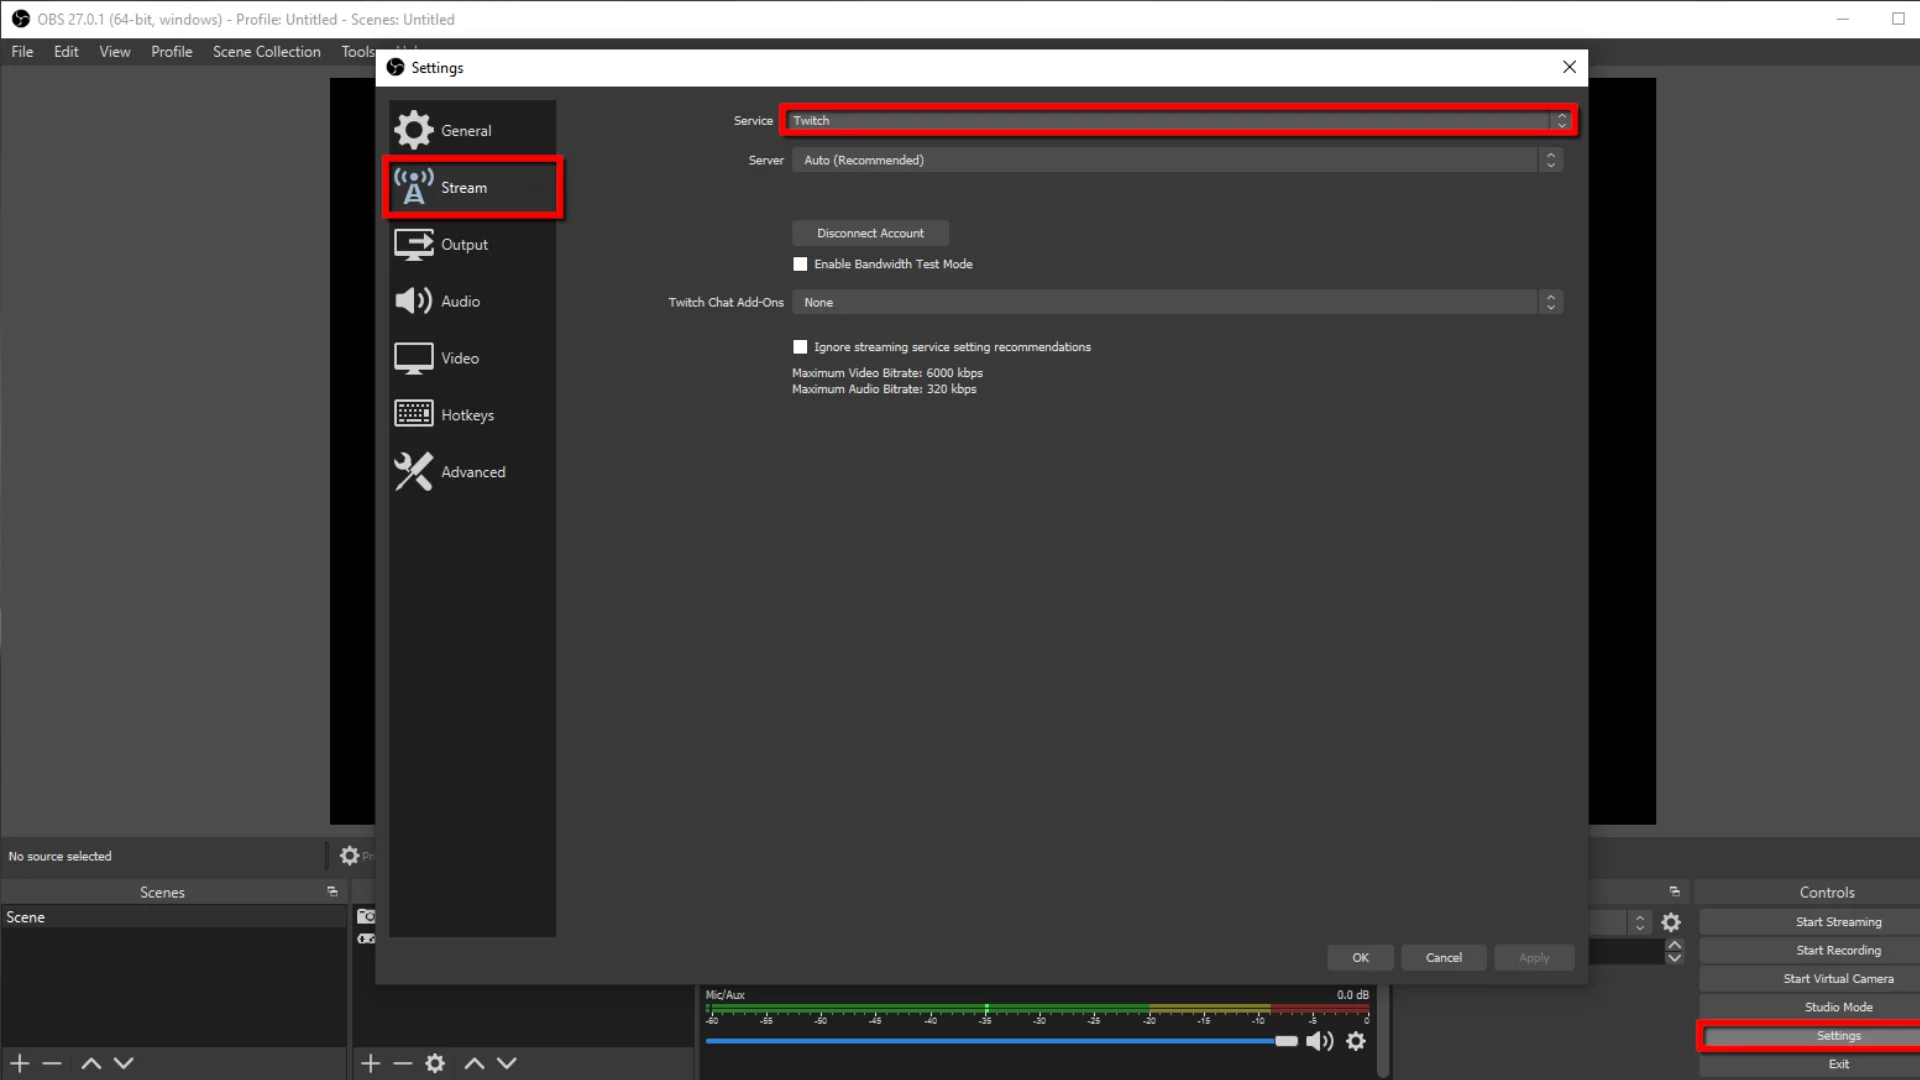
Best OBS Streaming Setting For Twitch
To start streaming on Twitch with OBS Studio, open the program and click the Settings icon in the bottom-right corner. Moreover, Look for the output tab located at the left side and change it to advanced options.
For the Encoder setting, pick one based on your computer’s hardware: use NVENC if you have an NVIDIA graphics card, AMF for an AMD card, or x264 for the best quality, though it uses more CPU power.
Next, adjust the Rate Control and Bitrate settings. Set Rate Control to CBR. If you’re streaming in 1080p at 60 frames per second, set your bitrate to 6000 Kbps. For lower resolutions or frame rates, use about 4500 Kbps.
For the best Twitch stream, set the framerate to 60fps or 50fps, the keyframe interval to 2 seconds, the preset to Quality, and B-frames to 2. These settings work well for 1080p at 60fps.
Best OBS settings for smooth TikTok streaming
TikTok is a common app for creating and sharing short video content. You can start a live stream if you have 1,000 or more followers. However, To get the best OBS setting for streaming on a TikTok using the computer, follow these steps.
Connect your OBS to TikTok:
- Launch OBS Studio on your computer. Click on File, then select Settings.
- Click on Stream on the left. Select Custom Streaming Server as the stream type.
- Copy the server URL and stream key from TikTok into OBS, then select OK.
- Set up your stream in OBS with scenes and sources. When you’re ready, click Start Streaming.
Streaming in Vertical Mode:
Since TikTok is used on mobile devices, so streaming in portrait mode is a good idea:
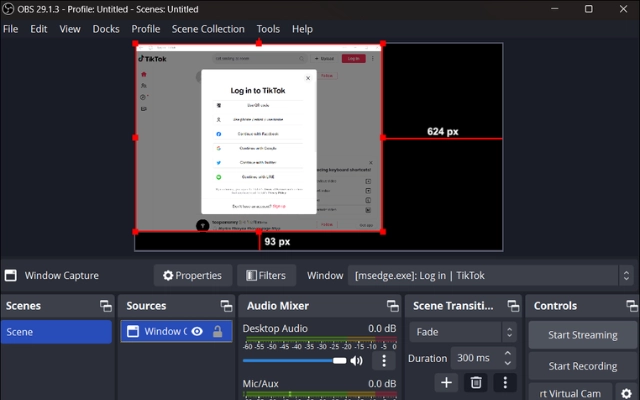
- Go to Settings in OBS and click Video.
- Change both the Base Resolution and Output Resolution to 1080×1920 for a vertical view.
This will help you stream easily from OBS to TikTok!
Best OBS Settings To Stream On Kick
Kick is a platform where people can stream live videos, like Twitch and YouTube Live. Moreover, Users can share their broadcasts in real-time, and viewers can chat and interact with the streamers. For the best OBS setting to live stream on kick, follow these steps;
Step 1:
- Visit the Kick site and create an account if you need one.
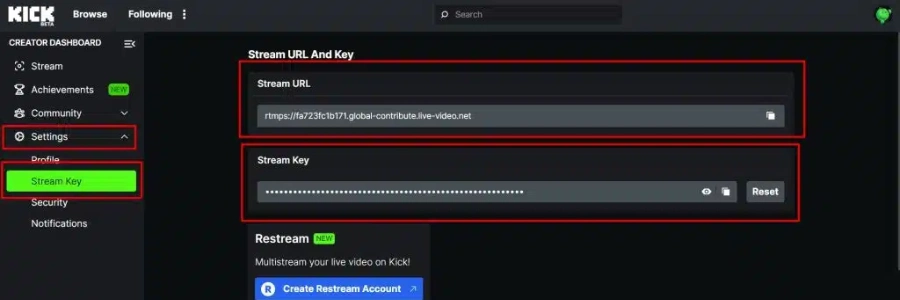
- After logging in, find Settings in the Creator Dashboard on the left. Click Stream Key and copy the stream URL and key.
Step 2:
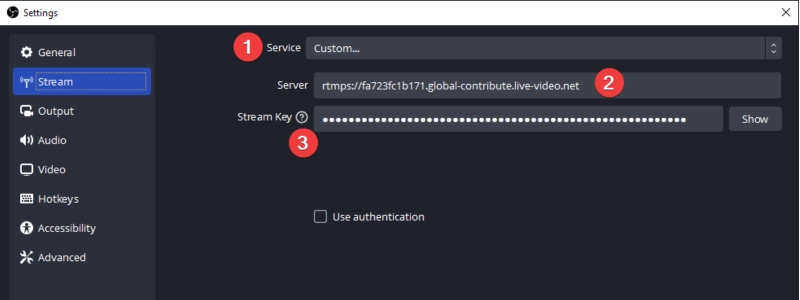
- Open OBS Studio on your computer. Click File, then Settings. Go to the Stream section and select Custom as your streaming service.
- Add the stream URL to the Server box and the key to the Stream Key box.
- Click Apply and then ok.
Step 3:

- In OBS, go to Settings and then Output. Then, Change the Output Mode to Advanced.
- Set the bit rate to at least 6,000 Kbps. Make sure your upload speed is 12 Mbps or more for this to work well.
- Set Keyframe Intervals to 2 and Profile to high. Choose hardware encoding or X264 for better streaming.
Step 4:
- Go to the Creator Dashboard on Kick. Click Edit Stream Info on the right.
- Enter your stream title and select the game you’re playing, then click Save.

Step 5:
- Click on the Start Streaming feature in OBS Studio. If it changes to “Stop Streaming,” you’re live!
Follow these steps to easily stream on Kick with OBS!
Using a low-end PC? Pairing these settings with the right software can make a huge difference — explore Best Streaming Software For Low-End PC.
FAQs
Why is my OBS recording lagging?
A:1 Lag in OBS recordings can happen if your computer is under heavy load, settings are not set up correctly, or your internet connection is poor.
What bitrate should I use for 4K 60fps recordings in OBS?
A:2 Use a bitrate of 20,000 to 51,000 Kbps for 4K 60fps recordings. Moreover, Adjust this based on your storage capacity and file size needs.
Why is my OBS recording quality poor?
A:3 Poor quality in OBS recordings can be due to your computer’s hardware and settings. If your graphics card is old and you’re trying to record in 1080p at 60fps, the videos might look blurry.
Final Words
To set up OBS for streaming, adjust the settings based on your computer’s performance and your goals. Start with basic settings like video bitrate and audio quality. If your computer is slow, choose lower resolutions and frame rates to avoid lag. However, For better quality, use 1080p at 60fps with the right bitrate. This will make your streams look and run better on Twitch and YouTube.